This chapter contains the following topics:
This selection is used to print and post invoices.
In order to print an invoice for a type O order, you must first specify the lines that are to be billed for the order. Invoices (type I orders) and credit memos (type C orders) can be printed and posted without further processing.
Use this selection to perform billing as follows:
| 1. | Select type O orders for billing, using Select for billing. You may select individual lines, or specify that all lines are to be billed. (Type I orders and credit memos are considered to be selected when they are initially entered.) |
| 2. | If a type O order has been incorrectly selected for billing, you may cancel the selection using Cancel selections. The order itself is not cancelled, and may be selected for billing at a later time. |
| 3. | Print an edit list of invoices, credit memos, and selected type O orders. |
| 4. | Print invoices for type I, type C and selected type O orders. |
| 5. | For type I orders and credit memos, all line items are printed. For type O orders, only selected lines are printed. |
Post printed invoices to the Inventory control and Accounts Receivable modules.
The invoice date (see Printing Invoices in this chapter) is the date that invoices or credit memos affect inventory valuation in Inventory control.
Select Billing from the O/E menu. Then choose Select for billing from the Billing menu.
|
Note |
When one user in a multi-user environment is printing invoices, other users are prevented from using this selection. |
Graphical Mode
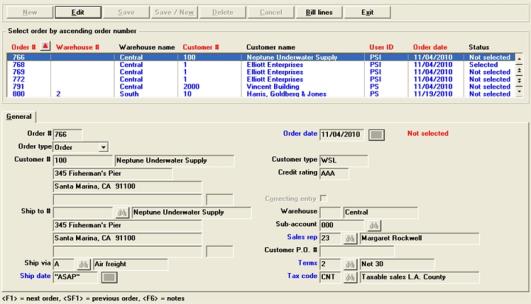
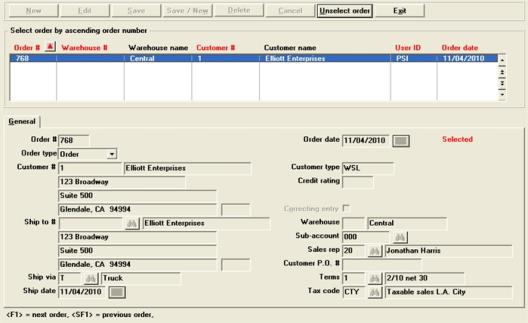
A screen similar to the following appears:
The list box displays up to 6 orders at a time. You may sort the orders by order number, customer number, warehouse number, user id, and order date, all in ascending or descending order. Only column names in red may be sorted. Click on the column name or the arrow to the right of the column name to change the sort or use the View options.
To locate a order, start typing the order number, customer number, warehouse number, user id, or order date, depending on which sort field is selected. You may also use the up/down arrows, Page up, Page down, Home and End keys to locate a order. The <F1> and <SF1> function the same as the up/down arrow keys.
Orders that display in the list box are available for changes or deletion. The fields for the selected order display in the lower part of the screen.
When the order is found, you may select the <Enter> key or Edit button to start editing.
You have the following options with the buttons and keyboard equivalents:
| Button | Keyboard | Description |
|
Edit |
Alt+e |
To edit an existing order |
|
Save |
Alt+s |
To save the new order or changes to an existing order |
|
Cancel |
Alt+c |
To cancel adding a new order or editing an existing order |
|
Bill lines |
Alt+b |
To bill lines for the order selected in the list box. See the Bill Line Options section below |
|
Exit |
Alt+x |
To exit the screen back to the menu |
You may edit fields on this screen. This is a list of the editable fields with a link to the same field in Orders enter where you can read about the specifics.
| Field | Link to field in Orders chapter |
|---|---|
|
Order date |
|
|
Customer number and name |
|
|
Address |
|
|
Ship number and name |
|
|
Ship to address |
|
|
Ship via |
|
|
Ship date |
|
|
Correcting entry |
|
|
Cost centers or Sub account |
|
|
Sales rep |
|
|
Customer P.O. # |
|
|
Terms |
|
|
Tax code |
Character Mode
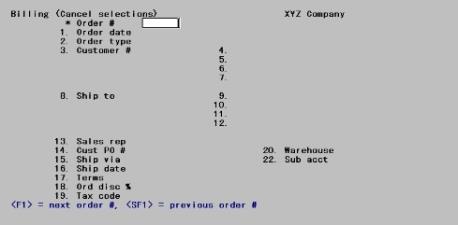
The screen that displays looks similar to this:
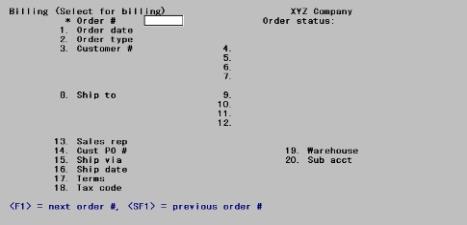
Enter the following information:
Order #
In the list box select the number of the order you want to select for billing or <F1> to scan through the unselected orders.
Only order type transactions can be selected here. Invoice and Credit memo type orders are selected when initially entered. Quotes and RMAs cannot be selected for billing. Rentals are selected from a separate menu selection.
If the order has already been selected, a message displays, asking if you want to reselect the order. Reselection cancels the prior selection of all lines on the order and allows you to reselect the desired lines.
If the order has not been previously selected, or if it has and you want to reselect it, you can make changes using Field number to change ?. (Changes to field numbers 2, 3, and 19 are not allowed.) Information requirements are the same as those in the Orders selection.
|
Format |
999999 |
Make any changes.
Select the Save button to keep the changes. Select the Cancel button to remove the changes.
Once you have found the order you want to bill click on the Bill lines button. A window like the following displays:

Using character mode, three options display at the bottom of the screen.
Options
You are then given these options:
| Character Mode | Graphical Mode | Description |
|
1 |
Use this option to automatically select for billing all the lines on the order. |
|
|
2 |
Use this option to select only specific lines for billing. |
|
|
3 |
Use this option to specifically select lines that are not to be billed (all other lines are selected for billing). |
|
|
Not available |
Review lines |
Allows you to view the lines without selecting the order for billing. However, you may also edit, add or bill selected lines. |
If you select Bill selected lines or Bill all lines except for a customer who does not accept partial shipments (as noted in A/R Customers), a message appears to warn you of this and you are asked if you want to proceed anyway. You can answer Yes to continue billing, or answer No to instead select Bill all lines. You can also press <Esc> to unselect this order and return its status to Not selected.
When billing lines, many of the fields can be accessed and new lines can be entered. For a description of the line fields, see the Order Line Items section of the Orders chapter.
Graphical Mode
Menu
You may print the orders edit list under the Edit list selection. Under the Options menu selection there are several selections that are unique to graphical mode. They include the following:
| Options Menu | Sub Menu | Description |
|
View inventory control |
Inventory history |
To view thse history for an item |
|
View inventory control |
Items |
To information about items including |
|
View inventory control |
Lot numbers |
To view lot information about a lot item |
|
View inventory control |
Serial history |
To view the serial number history or a serialized item |
|
View inventory control |
Serial numbers |
To view serial number information about existing items |
|
View inventory control |
Work order history |
To view the work order history or kits |
|
View inventory control |
Work orders |
To view open work orders |
|
View accounts receivable |
Customer invoices |
To view A/R invoices for the selected customer |
|
View accounts receivable |
Customer invoice history |
To view invoice history for the selected customer |
|
View accounts receivable |
Standard bills |
To view standard bills as entered in A/R |
|
View order entry |
Full order inquiry |
To search for open and invoiced orders |
|
View order entry |
Orders for an item |
To find orders by item |
|
View order entry |
Invoice history by customer |
To view invoice history by customer |
|
View order entry |
Invoice history by invoice |
To view invoice history by invoice number |
|
View order entry |
Invoice history by item |
To view invoice history by item |
|
Lot assignments |
N/A |
To access a window where you may edit and view the lot information for lot controlled items only |
|
Serial assignments |
N/A |
To access a window where you may edit and view the serial numbers for serialized items only |
|
Warranty assignments |
N/A |
To edit and view the warranty information for warranty items only |
By selecting this option, you can bill all lines on the order without selecting them one by one. The lines are billed exactly as they were entered on the order. If any information on the order has changed since it was entered, you should either first change the order using Orders, or you should use the Bill selected lines option here.
When using the Bill all lines option, only those items that were available to be shipped at the time the order was entered are billed. Back ordered or out of stock items are not billed but appear on the invoice, showing the amounts unavailable for shipment and their status (back ordered or out of stock).
After you select Bill all lines, there is a period of processing while each line on the order is selected for billing. Then the screen is displayed to enter the final billing information.
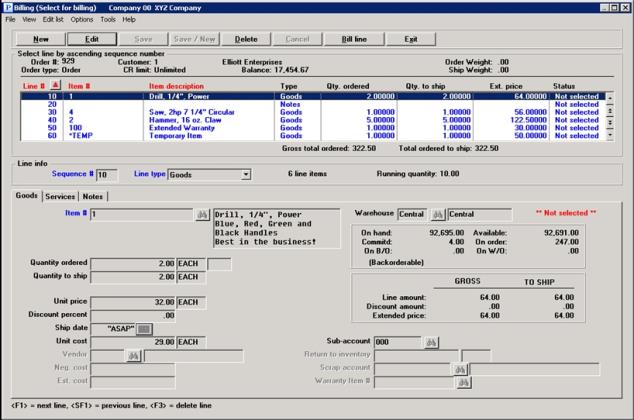
When you select this option, the line selection screen appears. This screen is very similar to the line selection screen in Orders, except that ** Not selected ** or ** Selected ** is shown to denote its billing status.
To select a line click on the Bill line button or hit the <Alt+B> keys. The button will change to Do not bill line. You may click it again at any time to reverse the selection. You may select <F7> to ship in full. For a full explanation of ship in full see Add or Edit a Line.
You may select the Edit button to make changes to this line. You may also use the New button to add a new line. See Add or Edit a Line.
Character Mode
In character mode a U (for unselected) or an S (for selected) is shown at the right of each line to denote its billing status.
In character mode, to select a line for billing, highlight that line and then press <Enter>. The line item entry screen is displayed, showing the details for the line item you have chosen, and you are asked Bill this line ?.
If you answer N, the screen clears, and the line item entry screen remains displayed. You may either enter the sequence number of a different line to be selected for billing, or use <F5> to return to the line selection screen.
If you answer Y, the line is selected for billing, and you are allowed to make changes to the line item.
Select this option when most of the lines on an order are to be billed exactly as they were entered.
Enter the number of the order to be billed. Select the option Bill all lines except. The line selection screen is displayed, showing an S for each line item that has been selected. A “U” is displayed for each line item that cannot be selected (see Selecting Serialized and Lot Controlled Line Items below).
Highlight a line item that is not to be selected, press <Enter>, and then answer N to Bill this line ?. The status of the line is changed from selected to not selected. The screen clears and you are still positioned on the line item entry screen. You may either enter the sequence number of a different line that is to be unselected, or use <F5> to return to the line selection screen.
Use the line selection screen to review the line items to ensure that only those lines that are to be billed have actually been selected for billing.
The customer will be billed only for the amounts that were available to be shipped when the order was initially entered, at the price initially entered.
When you have specified all lines that you don't want to appear on the invoice, press <Esc> at the Seq # field on the line selection screen.
You may add new lines or edit existing lines.
Add a Line
Entry of new lines is the same as when entering lines in Orders (Enter). See the Order Line Items section of the Orders chapter for details on adding a new line. Here are a few details:
| • | Using graphical mode select the New button to start the entry of a new line. To insert a line enter a sequence number between the two lines where you want to insert, otherwise accept the default sequence number. |
| • | Using character mode press <F2> to add a new line to the order. In character mode, when the line selection screen is displayed, you may add new line items to the order by using <F1> (insert). Alternatively, you can simply enter a new sequence number on the line item entry screen. |
| • | After you enter the line, you are asked if the line should be selected for billing. Answer Yes or Nn, as appropriate. |
Edit a Line
The only field you would normally change at this point is Quantity to ship. This field would require changing if the actual quantity shipped is different from the quantity ordered.
The options for handling back ordered items include:
| • | If you are billing items that were previously back ordered, it is possible that the price of the item has changed since the order was originally entered. You can change this field at this time. |
| • | To select an item for billing that was back ordered on an earlier invoice (made from this order), change the Quantity to ship from zero to the quantity you now plan to ship. |
| • | Whether the full quantity is available or not, you may select <F7> to ship the quantity in full and select the line. In character mode you will be asked the question "Bill in full ?". If the full quantity is not available selecting <F7> (Enter Y in character mode) will in result in a negative quantity available. Keep in mind that when the items are eventually received in inventory, the costs could be different which could result in less profit on the invoice line. If the full quantity is not available for a serialized or lot control item it cannot be selected in full. |
If you want the reverse a line selected with <F7> you must unselect the line. You may also edit the line and change the Quantity to ship back to what it was.
In Character mode the "Bill in full ?" message displays every time. If you do not want to see the message use BreakOut to enter a value of N and skip the field.
|
Note |
This option is not valid for text lines. |
If you press <F5>, the following message is displayed:
You have selected to change the item number for this line item. Are you sure you want to do this ?
If you answer N, the message clears, and the cursor returns to Field number to change ?.
If you answer Y, the cursor moves to Item #. Enter the new item number for this line. Complete entry of all fields, as if you were entering a new line item. When completed, this new item replaces the line item that previously displayed for the sequence number.
If you enter the item number of a miscellaneous or loose kit, the item is processed as a normal item.
If you press <Esc> prior to completing entry of the new item information, the original line item is restored.
If this is an E.D.I order, you will be prompted with the following: This is an E.D.I. order - continue with changes _? Enter Y to make a change, or N to continue without making any modifications to this record.
When you have finished making changes to the line item, press <Enter> at Field number to change ?.
If the line item is serialized or lot-controlled, you are asked if you wish to make any changes to the serial or lot entries. Answer Y to change or complete entry of the serial numbers or lot allocations. When completed selecting (or unselecting) a line item, enter the sequence number of another line to be billed.
Options
You may use one of the options:
|
<F1> |
To display the next line item on the order |
|
<F2> |
To assign a new sequence number and add a new line item to the order |
|
<F5> |
To return to the line selection screen |
|
<Esc> |
To display the final screen used in Select for billing |
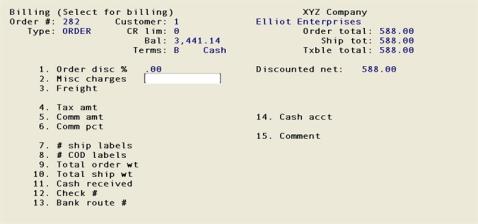
After all lines that are to be billed have been selected, press <Esc> at Seq #. The third screen displays.
The information requirements for the final screen are the same as those for the Totals screen of Orders when entering an Invoice order. Refer to the instructions in the Orders chapter.
|
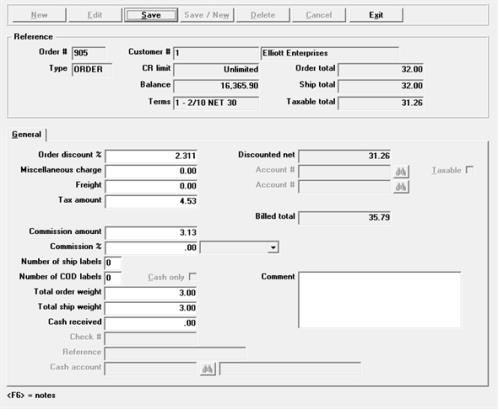
Example |
If you select both line items on order for billing, the final screen appears similar to this: |
For a serialized line item, a serial number must be specified for each piece to be billed.
For a lot-controlled item, the quantity to be billed must be fully allocated to one or more lot numbers.
To change serial numbers for a serialized line item or lot numbers for a lot-controlled line item, use the Bill selected lines option. Enter the serial number or lot number information in the same manner as in Orders.
If you choose the Bill all lines option for an order that requires serial number entry or lot allocation, you are asked if you wish to continue with line items that are valid for selection or if the entire order should be unselected.
If you choose the Bill all lines except option for an order with incomplete serial number entry or lot allocation, the related line items are automatically unselected.
The totals screen displays to enter additional charges and supplementary information.
Graphical Mode
Menu
There are several standard menu selections that are available from any graphical window. In addition to these you may also select one of the following:
| • | Edit list to print the orders edit list. |
| • | Options > Order notes to edit or view notes. |
| • | Options > Sales tax distributions to edit sale tax. If your sales tax has only one line of tax this will not apply to you. |
| • | Options > Prepayments applied if you are using the prepayment features and pre payments have been applied. |
Character Mode
Fields can only be entered using Field number to change ?.
Enter the information as follows:
|
Format |
99.999 |
Options
Update the discount percentage that applies to the entire order, or use one of the options:
|
<F2> |
To use the customer's trade discount percentage from Customers |
|
<Enter> |
For .00 (no order discount) |
This discount percentage is applied to the total amount of the order after any individual line item discounts are given.
Enter the amount of any miscellaneous charges for the order.
|
Format |
99999999.99- |
If the A/R Control information specifies that miscellaneous charges are to be distributed, you are asked to enter the miscellaneous charges account number. Otherwise, the miscellaneous charges are automatically distributed to the default miscellaneous charges account specified in the A/R Control information.
Enter the account number or press <F2> to use the miscellaneous charges account entered in the A/R Control information.
Enter Y if the miscellaneous charges are taxable and N if they are not.
Enter the freight charges for this selected order.
|
Format |
9999999.99- |
If the A/R Control information specifies that freight charges are to be distributed, you are asked to enter the freight account number.
Enter the account number or press <F2> to use the default freight account specified in the A/R Control information.
The sales tax amount is automatically calculated and displayed, using the tax code entered on the first screen of order information, the taxable items on the order, the freight charges (if you checked the box (answered Y) to Sales tax calculated on (Freight) in the A/R Control information), and the taxable status of miscellaneous charges.
|
Format |
99999999.99- |
The tax amount will also be effected by calculating the tax by line as setup in the A/R tax code. For an example of this type of taxation see the Sample tax calculation section of the Tax codes chapter in the Accounts Receivable documentation.
In character mode you can use Field number to change ? to enter a different sales tax amount.
If you select to change this field and later change your mind, you can press <F1> to return to the amount that was automatically calculated.
Overriding the Calculated Tax
If you enter an amount different than the calculated sales tax, a window displays for you to distribute the sales tax if:
| • | You enter a sales tax amount that is different from the displayed calculated tax |
| • | The amount entered is not 0 |
The tax code that applies to this sale specifies distribution to more than one account.
If O/E Control information specifies that commissions are not used, this field cannot be changed or entered.
|
Format |
99999999.99 |
The commission amount is automatically calculated and displayed, based on the commission codes for the inventory items on the order, if you specified in O/E Control information that commissions are to be used. If an item has no commission code the commission percentage associated with either the sales rep or customer is used to calculate the commission on the item, as per the setting in the A/R Control information.
If you assign a commission code to an item with ascending prices, the commission for that item is calculated using either the commission rate associated with Price-1 (if the item sales price is price-1 or greater), or the commission rate associated with an override (if the item sales price is below price-1).
If you change this field and later change your mind, you can press <F2> to return to the amount that was automatically calculated.
If the commission code for one or more of the inventory items specifies a commission based on margin (gross profit), or one or more inventory items have no commission code and the commission percentage associated with the sales rep or customer (as per A/R Control information setting described above) is on margin, and standard costing is not used by I/C, the message Comm calculated during posting is displayed. You can override this by changing the commission amount.
If the O/E Control information specifies that commissions are not used, this field cannot be entered.
The commission percent displays as .00. You may enter or change an actual commission percent. The commission amount is then automatically calculated based on the discounted net.
The defaults for the commission percent and method (on price or on margin) come from one of two sources:
| • | Customers, if you specified in A/R that commissions are calculated based on customers. |
| • | Sales Reps, if you specified in A/R that commissions are calculated based on sales reps. |
If the message Comm calculated during posting is initially displayed, you may still enter a commission percentage. In this case, the percentage you enter is used to determine the commission on the order, rather than the commissions associated with the individual line items.
If you specify that the commission percentage is to be based on margin the commission amount will be calculated during posting using the percentage that you enter here.
|
Format |
99.99 |
Enter the number of shipping labels to be printed.
|
Format |
99 |
If zero is entered for this field, shipping labels can still be printed using individual shipping label printing, which allows entry of an order number and the number of labels to be printed for the order.
Enter the number of COD labels to be printed.
|
Format |
99 |
Note that the terms are displayed on the totals screen so that you can determine whether COD is relevant to the entire order, or just the freight amount, etc.
If this field is left at zero, COD labels can still be printed using individual COD label printing, which allows entry of an order number and the number of labels to be printed for the order.
If you specify that one or more COD labels are to be printed, an additional field appears:
Answer Y if only cash is acceptable for the COD (that is, checks are not accepted).
Enter the weight of the order.
|
Format |
9999999.99 |
The actual shipping weight may be different that the calculated weight.
Enter the total shipping weight of the order or accept the default as calculated by the system.
|
Format |
9999999.99 |
Entry in this field is allowed only for transaction types Orders and Rentals.
For Loan type transactions this is an memo information field only.
Enter the amount of any payment received with the order, or press <Enter> if no cash was received.
|
Format |
999999999.99 |
Applying prepaid cash is only available if you checked the Process prepaid cash field (entered Y) in A/R Control information. Also, your answer to Post cash receipts for in O/E Control information determines whether amounts entered on Order type transactions automatically generate Cash receipts transactions during posting, or whether they are treated as informational only. If used as a memo information field the payment must be entered manually into A/R, using the Cash receipts selection on the A/R menu and applied to the invoice after posting both the cash receipt and invoice to open items.
If you have selected Invoice, order & prepaid (3) to the O/E Control information field Post cash receipts for, and you have entered and posted at least one or more Non-A/R prepaid cash receipts (N types) for the selected customer you can apply up to three prepaid cash amounts to an order.
If you applied prepaid cash when entering the order this field will be skipped. However, you may change the prepaid cash amounts. If you did not apply prepaid cash, then you may apply it here.
You must have an RW.LIC PBS license file that includes the credit card software subscription in order to use the PBS Multi-payment features. If it is not available on your system, contact your PBS provider for instructions.
For configuration instructions, see the appendix PBS Multi-payment Setup in the Accounts Receivable user documentation.
PBS Multi-payment processing allows you to select payment types of cash, check and credit card(s) You may also assign all or part of the total order amount to A/R terms. You may use one or multiple payment types for each order. For example, part of the order may be paid via check and the remainder can by applied to A/R terms. Another example, you may pay an order with two credit cards.
Payments on billed orders are not posted to open items and cash history until after the order is selected for billing, printed and posted. During posting the payment information is written to cash history and open items. It then becomes available for deposits.
When using a credit card as a payment method the system interfaces to a credit card processor. A credit card payment window displays for entering the credit card information. You may have already done this when you entered the order in Orders (Enter). If this is so the credit card payment was pre-authorized. It is not fully authorized until the order is selected for billing.
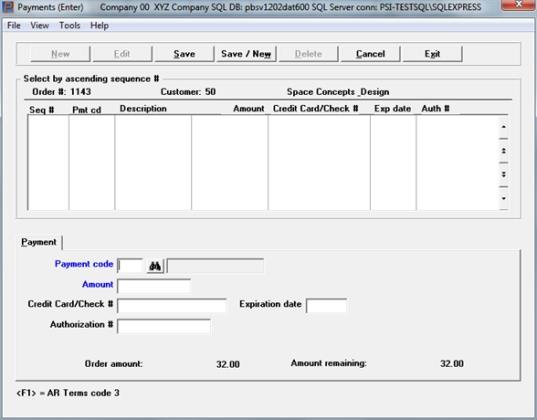
Payment Window
A screen similar to the following displays:
Character Mode
Using Graphical mode there are two display-only fields. They are near the bottom of the screen:
Order amount:
This is the amount that must be fully paid or applied to the customer terms.
Amount remaining:
This is the amount that has not been paid. This number will reduce when payments are entered. The amount remaining must be zero before you can exist the payment window.
Enter these fields:
Enter the payment code. The choices are determined by what you entered in Payment codes found under Setup menu in CTL. For entering these codes see the Payment Codes chapter in the System user documentation. You may also use the option:
|
<F1> |
To apply the whole or any of the remaining amount to the customer's A/R terms. |
Enter the amount or use the <Enter> key for the remaining balance.
After entering the amount, what happens next depends on the payment type used:
| • | If you selected A/R terms or a payment code of cash then you are finished and you may save the entry. |
| • | If the payment code is a check type you must enter the check number next. |
| • | If the payment code is a credit card type, the Credit Card Processing Window displays. |
This field can only be entered if you are paying by check.
If you are paying by credit card, the Credit Card Processing Window opens. When finished with the credit card processing this field is automatically entered.
Expiration date
If you are paying by credit card, the credit card payment window opens. When finished with the credit card processing this field is automatically entered.
This field can only be entered if you are paying by check.
If you are paying by credit card, the credit card payment window opens. When finished with the credit card processing this field is automatically entered.
After you have finished entering the payments you may exit and then save the order, invoice or credit memo. When you exit the payments window, the Cash received field on the Totals tab becomes a total of the cash, check and credit card payments made.
If the payment amounts do not match the total invoice amount then a message indicates that "Balance amount remains - cannot exit!". You must enter another payment or put the remaining amount to terms.
If you want to cancel the selection delete all the payments first. Exit the screen and a message displays indicating: Payments do not equal billed total, cancel selection? Enter Yes to cancel the selection of the order or Enter No if you want to remain on the Totals screen where you can edit those fields. At that point you can still cancel the selection by selecting Exit or re-enter the payments to finish the selection.
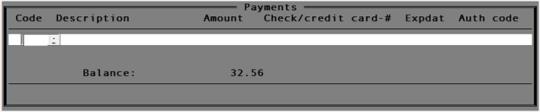
The same window displays for both graphical and character modes.
This is an example of the X-charge credit card payment window:
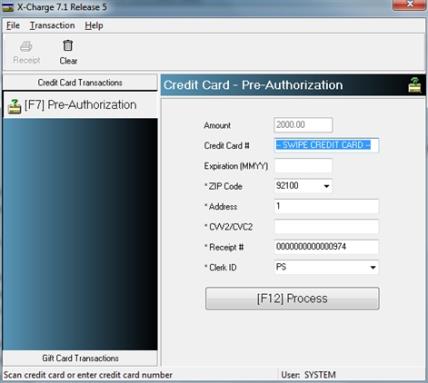
After swiping the card number or entering it manually and selecting Process, an Approved message displays with the authorization number. If you get an error message, for an explanation see the appendix called PBS Multi-payment Setup in the Accounts Receivable user documentation. You may need to contact X-charge for help.
The order total can change if you did not select all the lines, if there are items on back order, if you entered new lines during the selection process, modified the shipping charges or miscellaneous charges and so forth. If you have a credit card payment, you have these choices for handling the change in payment when there is a change in the total:
| • | If the amount remaining is a positive number, enter another credit card payment. |
| • | The amount remaining can be a negative or positive number. |
Whether the amount remaining is a negative or positive number, you may delete the original credit card payment. Depending on the status of the credit card payment, deleting it either voids or refunds the payment with X-charge. Then you may enter a new credit card payment, use any of the other payment options or put the remainder on A/R terms.
| • | You may keep the existing credit card payment and put the remainder on terms or use some other payment method. |
You are returned back to the payment window for reviewing the payment and if needed, entering additional payments.
If there is a prepayment in open items for the customer the following question will display:
Apply prepaid cash?
The prepaid balance will display just above this question.
If you selected No (entered N) the cursor will go back to the Cash received field. If you select Yes (entered Y). For what to enter next in character see Character Mode. In graphical mode the Select Prepaid Document window will display and will be similar to the following :
Graphical Mode
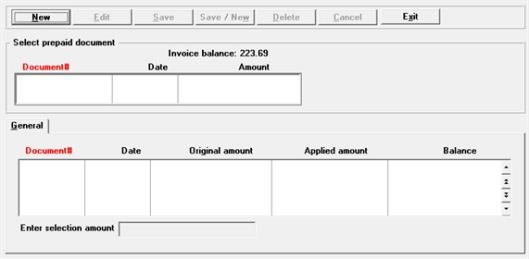
Select the New button to start the prepaid amount application or select Exit to return to the Cash received field.
To edit an existing prepaid application select the Edit button. Select the Delete button to delete an existing prepaid application.
The save the prepayment selection, select the Save button. To save the prepayment selection and enter a new one, select the Save/New button. To cancel entry, select the Cancel button.
The prepaid amounts from A/R Open items display in the lower list box. After selecting a prepaid amount and saving it the prepayment displays in the upper list box. Up to three prepayments may be applied to one order or invoice.
The amount in this field either defaults to the invoice total, or if less, the maximum prepaid amount available. Once you have applied a prepayment, then it defaults to the amount remaining to be paid.

Enter an amount or accept the default amount. The default is the prepaid cash amount remaining for the first available prepaid amount.
Enter selection amount: 250.50
After entering an amount and selecting the Enter key and the following question will display:
Find another prepaid item?
If you have more than one prepayment amount in Open items, you may select another to pay the order or invoice.
If you select Y, then the program will look for another prepaid amount in Open items for the customer. You may continue this process until you find the correct prepaid cash receipt.
If you select N, then the program will not look for another prepayment.
Once you have selected three documents the message "A maximum of 3 payments have been selected” displays.
When you are finished or when there are no more prepaid amounts to choose from the following message displays:
Selections completed - do you wish to reselect ?
You may select Y to reselect or N to complete the selection process.
Once you are finished with the selection process the Check # and Bank route # fields will be skipped.
Prepaid cash has been applied
Do you want to reselect prepaid amounts ?
If you select the Cash received field from Field Number to Change ? then this above will display. Select Y to re-enter prepaid amounts or N to enter a manual amount.
If the amount of cash received is not zero, enter the check number or press <Enter> if currency was received instead of a check.
If no cash was received, this field is automatically skipped.
|
Format |
99999 |
If you applied a prepayment amount to the order or invoice, then the order number will be written to this field.
This field displays cannot be entered for C - Credit memos Q - Quotes and R - RMAs. In character mode it does not display at all for quotes.
If the payment received is zero, or if you received payment in cash, this field is skipped and is left blank.
Otherwise, enter the routing number that is on the check. This is usually in the lower left-hand portion of the check and looks something like 99-999/999. This field is informational only and may be left blank.
|
Format |
15 characters |
|
Example |
Press <Enter> to leave this blank. |
If you applied a prepayment amount to an order or invoice, then
* * PREPAID * *
will display in this field. See the Cash received field for an explanation of prepayments.
If you entered cash received on this screen, enter the cash account number to which the cash received is to be distributed.
Options
You may also use one of the options:
|
<F1> |
To use the default cash account entered in O/E Control information |
|
<F2> |
To scan through the cash accounts |
If no cash was received, this field is automatically skipped.
Enter any comments you want to appear on the invoice.
If you are Immediately printing the order as an invoice, the only way to enter a comment is here. If you print the invoice via Invoices (Print) and leave this field blank , default comments you enter in that selection will be printed on the invoice for this order.
|
Format |
5 lines of 30 characters each |
Click on the Save button or select <Alt+s> to save your changes and completed the selection for the order.
Character Mode
Field number to change ?
For a type O order, the fields may be changed using Field number to change ?. If a cash received amount is entered in field # 10, you must enter field #’s 11 through 13.
When completed selecting orders to be billed, press <Esc> at Order #.
If you are set up for credit checking per O/E Control information and the customer is over the credit limit, a credit limit warning message will display similar to this:
![]()
When the customer is over the credit limit, then you have the following options:
|
Character Mode |
Graphical Mode |
Description |
|---|---|---|
|
1 |
Delete order |
This deletes the entire order. Per the O/E Control information you may be restricted from deleting an order. Per the O/E Control information you may be restricted from deleting orders. |
|
2 |
Ignore credit limit |
This allows you to ignore the credit limit for the customer and finish the selection of the order. |
|
3 |
Cancel selection |
This will cancel the selection of the order, after which the order can be changed, deleted or re-selected. |
You will be asked Are you sure ?. Select Yes or No as the case may be.
This option will only be available if you are set up for printing invoices immediate in O/E Control information. See the Fourth Tab - Default/User Forms section of the Control Information chapter.
You may print orders immediately as invoices. This bypasses the batch printing step.
Graphical Mode
If you are using immediate invoice printing, the following window displays:
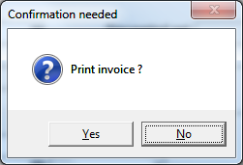
| Character Mode | Graphical Mode | Description |
| I |
Yes |
For the order printing as an invoice immediately |
| (ENTER) |
No |
To not print the invoice now. No is the default |
Depending on the set up in O/E Control information for immediate invoice printing, you may be asked to select a printer or it may default to a pre-selected printer.
It uses the Order form type. If there is not one available, it uses the Invoice form type.
Only one user at a time may print invoices immediately.
If a Company information laser printer or Windows printer is selected you will be asked to enter the alignment and print number of copies. You may make changes or accept the defaults.
If you selected a -PDF- printer the PDF invoice displays.
A questions displays Is the invoice printed OK ?. Select Yes if it is or No if it did not. If you select No the order will remain selected. The order can be un-selected/re-selected, changed, deleted or the invoice may be printed in Select for billing later (after re-selecting it) or printed during a batch invoice process using Invoices (Print).
If the starting invoice number has already been used in invoice history or in another I type order that has not been posted, the program looks for the next available invoice number and uses that.
You must select rentals before they can be invoiced.
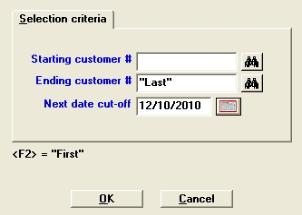
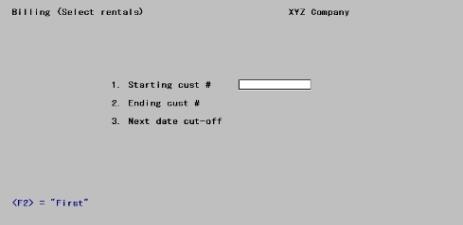
From the Billing menu, choose Select rentals. The following screen displays:
Graphical Mode
Character Mode
Ending customer #
Enter the starting and ending customer.
Options
You may also use the option:
|
<F2> |
For First and Last |
|
Format |
15 characters |
Enter the latest date to include for selection.
Options
You may also use the option:
|
<F2> |
For Latest |
|
Format |
MMDDYY |
Select OK to select rentals or cancel to return to the menu.
The screen displays the processing status. Press <Esc> to exit.
When a back ordered item has been received into your inventory and entered through Inventory in I/C, you can use this selection to manually fill back orders. Alternatively, you can use the Fill back orders selection to automatically update the quantity to ship for back ordered line items. Refer to the Back Orders chapter, for more information on the Fill back orders selection.
To manually fill back orders, select the order with back ordered items. Then use the Bill selected lines option and enter the appropriate quantity to ship. Orders that still contain items on back order remain until fully shipped.
You can cancel selection of Order type orders that have been incorrectly selected for billing. The order itself is not cancelled; only its selected status is cancelled.
Invoice and credit memo type orders entered using Orders (Enter) are selected for billing automatically and may not have their selection status cancelled. If you have permission you may delete them in Orders (Enter). If you are using PBS Multi-payment, you must remove the payments before you can delete them. Per the O/E Control information you may be restricted from deleting orders, invoices and other transaction types.
When using PBS Multi-payment and the order has a credit card payment, the order cannot be cancelled. You must print and post the order and then enter a credit memo against the invoice. If a payment type other than credit card is used it can be cancelled.
Select
Cancel selections from the Billing menu.
A screen similar to the following appears:
The list box displays all the orders that are selected for billing. Locate the order you want to unselect using the Up/Down arrows, Page Up/Page Down and Home/End keys.
Once you have found your order, with the order line highlighted, click on this button to unselect the order. You may also double click on the line.
Cancel selection of this order ?
This window displays for verification on canceling the order. Click on Yes to cancel or No to retain the selected status for the order.
If you have applied cash or have applied prepaid cash, then one of two questions will display regarding the Cash.
If you are using PBS Multi-payment, you cannot unselect an order if it was paid via credit card. You must print and post the invoice and then write a credit memo against it. When you write the credit memo you may reverse the credit card charges then.
Order selection cancelled
A message displays letting you know that the order is no longer selected for billing.
Select the Exit button to return to the menu.
Character Mode
A screen appears for you to enter the number of the order that is to be unselected for billing.
When the order is displayed on the screen, you are asked Cancel selection of this order ?. If you answer N, the screen clears and you may enter the number of another order. If you answer Y, the billing selection for the order is cancelled. Press <F1> to display the next selected order.
The Post cash receipts for field in O/E Control information determines if you are able to receive cash or prepaid cash amounts on an order. If the order has a cash payment applied you will be asked:
Cash has been received
Do you want to clear this amount ?
Click on Yes to clear the cash or No to allow the cash to remain with the order. When No is selected the cash cannot be applied to any other order unless you select the order for billing and cancel the selection again.
If you have applied a prepaid amount, then the following question displays:
Prepaid cash has been applied
Do you want to remove prepaid amounts ?
Click on Yes to clear the prepaid amounts or No to allow the prepaid amounts to remain with the order. When No is selected the prepaid amount cannot be applied to any other order unless you select the order for billing and cancel the selection again.
If you are using PBS Multi-payment, you cannot unselect an order if it was paid via credit card. You must print and post the invoice and then write a credit memo against it. When you write the credit memo you may reverse the credit card charges then.
When you are finished, press <Esc> at Order #.
Use this selection to print a list of selected orders. Only selected Order, along with all Invoice and Credit memo types are printed on this list.
See a Billing Edit List example in the Sample Reports appendix
Select
Edit list from the Billing menu. You can also select Billing edit list from the Reports menu.
Graphical Mode
Character Mode
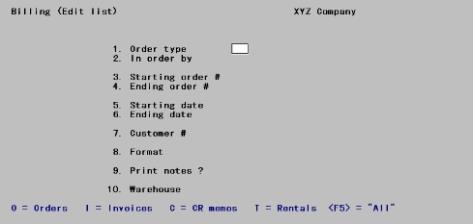
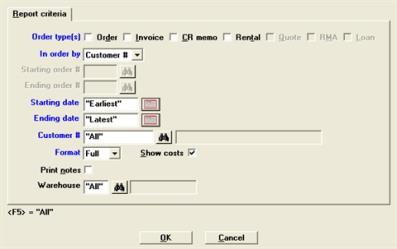
Enter the following information:
Enter up to two types of orders to be included on the edit list, pressing <Enter> after the first type. The choices are:
| Character | Graphical |
|
O |
Order |
|
I |
Invoice |
|
C |
CR memo |
|
T |
Rental |
|
<F5> = All |
<F5> = All |
|
Format |
One character |
Enter the order in which you want the edit list printed, either by Order #, or by Customer #.
If you enter Order #, the Customer # field is skipped, because orders for all customers falling within the order range will be printed.
If you enter Customer #, the Starting and Ending order # fields are skipped, because all order numbers falling within the customer range will be printed.
|
Format |
Drop down list |
Ending order #
|
Format |
999999 for both fields |
Enter the range of orders to print on the list.Enter the range of orders to print on the list. Follow the screen instructions.
You may optionally select <F2> for "First" or <F2> for "Last" for the Starting and Ending order number fields respectively.
Ending date
Enter the range of order dates to print.
You may optionally select <F2> for "Earliest" or <F2> for "Latest" for the Starting and Ending date fields respectively.
|
Format |
MMDDYY for both fields |
Enter the customer number for the orders you want to print on the list, or press <F5> to print orders for "All" customers. The default is "All".
If you selected to print by order number for the In order by field, this field cannot be entered.
|
Format |
12 characters |
Select the format in which to print the edit list, either Full for full format or Brief for brief format. The default is Full.
The brief format does not show cost center, warehouse, addresses, line discount percent, scrap account, comments, totals, distributions, or serial or lot numbers.
|
Format |
1 character |
If you select the full format, an additional field appears:
Check this box if you wish to show costs on the edit list. The default is checked.
Check this box to print notes for each order. Leave it unchecked to not include notes. The default is unchecked.
|
Format |
Check box, checked is yes and unchecked is no |
This question can only be entered if you selected to use multi-warehousing in the I/C Control information.
Enter the warehouse code for the orders you wish to print on the list.
Options
You may use one of the options:
|
<Enter> |
To print orders only for the Central warehouse |
|
<F5> |
To print orders for All warehouses |
|
Format |
Two characters, the default is <F5> for "All" warehouses |
Select OK to print the edit list or Cancel to return to the menu.
After verifying the billing selections, you may print the invoices.
Select Print from the Invoices menu.
Select
Print from the Invoices menu.
Graphical Mode
The invoice printer selection screen will display:
To avoid possible duplicate invoice numbers, this screen cannot have default settings using MySet.
Character Mode
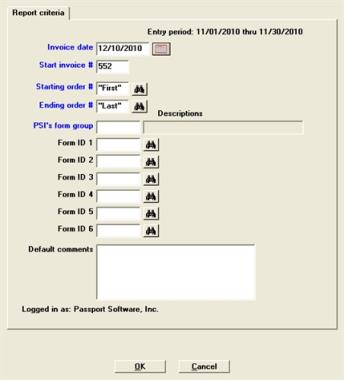
The screen to print invoices appears similar to this:
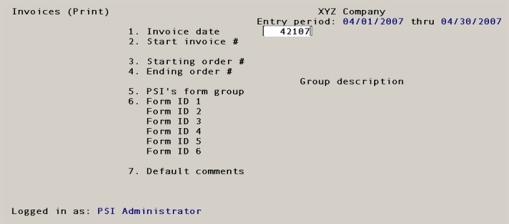
Date Control
If you are using date controls as setup in A/R Control information, then the entry period will display in the upper right corner of the screen. For an explanation of date controls see the Account Receivable user documentation Control information chapter.
In the lower left corner of the screen displays the words Logged in as: followed by the name of the user. Form groups may be entered and they are specific to a user.
Enter the following information:
Enter the date you want printed on the invoices or press <Enter> for the system date.
The invoice date entered here will be the transaction date of the sale when these invoices are posted to Accounts Receivable.
The invoice date is also the transaction date for inventory posting in I/C. To decrease inventory value as of a certain date, an invoice must be dated, printed and posted on or before the valuation date.
|
Format |
MMDDYY |
You may be warned or prevented from entering a date that is outside the allowed date range. This date range is entered in the Accounts Receivable Control information.
Enter the invoice number to print on the first invoice in this printing run or press <Enter> to use the next invoice number in sequence, based on the Starting invoice # field in O/E Control information.
|
Format |
999999 |
Starting order # and Ending order #
Enter the range of orders for which invoices are to be printed. Follow the screen instructions or press <F2> for First to Last.
In a multi-user environment, if one user selects to print invoices for all orders while another user is entering an I type order, this new I order may be immediately invoiced.
To avoid this, the user who is printing invoices should select a specific range of order numbers, rather than First to Last. Invoices will print only for the selected orders within the range that you specify.
|
Format |
999999 |
Enter the form group number to access a previously saved form group.
Form groups allow you to print multiple forms ID’s for the same invoice. Each form group is specific to a user. When using the program the question marks in the above field name are replaced with the initials of the user ID who is logged into PBS.
Options
You may use one of the options:
|
<F1> |
To scan through the form groups |
|
<SF1> |
To scan through the previous groups |
|
blank |
To use a temporary group |
|
Format |
Three characters |
If you are entering a new form group number, then you will be asked this question:
Not on file. Do you wish to add this group?
If you select No, the you will be returned to the group field.
If you select Yes, then you will be prompted to enter the Group description.
Enter a description that best represents the group of forms.
|
Format |
Thirty characters |
Enter the ID of the form(s) to be used for invoice printing.
Options
You may use one of the options:
|
<F1> |
To scan through the forms in the Form file |
|
<SF1> |
To scan through the previous form |
|
<Enter> |
To use the default form ID specified in O/E Control information |
|
Format |
Five characters |
The program will print an I type form for an Invoice type, an O type form for an Order type, a C type form for a Credit memo and so on.
If the form ID does not have an Invoice, Order, or Credit memo type defined for it, a message displays to inform you that invoices will not be printed for the orders with missing form types. If none of the three types are defined for the form, no invoices can be printed.
You must enter a Form ID number in the Form ID 1 field. The other fields may be skipped.
If your form type prints with a graphical image, then you must either select Windows printer or a Company information PDF printer. Windows printer is only available if you are using the Windows or Thin Client versions of PBS. You may read more about PDF Invoice Generation and Emailing below.
Enter any comments to be printed on invoices that do not already have comments specified earlier.
|
Format |
5 lines of 30 characters |
You may select <Cancel> to return to the menu without printing invoices. Make any changes and then select <OK> to print your invoices. The following message will display.
Please mount invoice forms on printer and check this box when ready
Check the box and select OK to continue. Select Cancel to return to the menu without printing.
If you are using a Laser printer then put the forms in the proper tray.
If you are using a format that merges the data with a graphical file then you are finished because mounting forms is not required.
If you are using a dot matrix printer, mount the invoice forms on the printer so that the print head is at the top of the form. Adjust the printing pressure according to the thickness of the invoice forms.
You are then asked: Print alignment ?. Answer Yes to print a test alignment form filled out with X's and 9's. Answer No when the form alignment is correct or if you do not wish to print an alignment form.
Alignments may be used for any of the following:
| • | Company information laser printer |
| • | Company information -PDF- or -PDFP- printer |
| • | Windows printer |
| • | Company information dot matrix printer |
If you have aligned the form in the past the default alignment settings are recalled from the last time done. You should only generate an alignment if the form has changed, the printer has changed or the driver on your computer has changed.
If you select a Company information -PDF- printer the program displays the alignment image as long as Adobe Acrobat or Adobe Reader is installed on your system. You may also view the alignment again from the CTL menu selection Email/view printed PDF's, located under the main menu selection PDF form file processing.
If you select Windows printer a Windows printer alignment screen displays. To change the alignment for Windows printer enter a number greater than the Default top margin or the Default left margin as the case may be.
Alignments to a Company information non-laser printer, like dot matrix, is done manually by adjusting the form on the printer.
If you are on UNIX or Linux and you have set up only one printer in Company information, you will get the alignment screen next.
If you are on Windows or Thin client or you are using multiple printers in UNIX/Linux, select the printer on which the invoice forms are mounted. You may select Windows printer. This is essential if you want to print the invoice with a corresponding graphical form file. See the Forms chapter on how to set this up.
If you are generating a PDF file for each invoice, select a -PDF- or -PDFP- printer.
PDF Invoice Generation and Emailing
When you print the invoice with a Company information -PDF- printer, the program generates a PDF file for each invoice You will find a definition of PDF in the Understanding Order Entry chapter. The name of each file will momentarily display on the screen as it is being generated.
You may also print and generate PDF files simultaneously using a -PDFP- printer.
Because this is a batch process and many files could be generated at the same time they will not display here. However, you may view the generated PDF files from the Ctl menu selection Email/view printed PDF's, located under the main menu selection PDF form file processing. Either Adobe™ Acrobat™ and Adobe Reader™ must be installed on your system. From that same menu selection you may also email PDF files. To learn more about the viewing and emailing PDF features read the PDF Form File Processing chapter in the PBS System documentation.
To setup emailing in PBS see the appendix Email Configuration in the PBS Administration documentation.
O/E invoice PDF files and alignments are created in the PDFFIL\OEINVOICES directory. An example of the O/E invoice PDF file name is xx_OEI_100_001113.PDF. The xx indicates the company number. The OEI means it is an invoice printed from Order Entry. The ‘100’ is the company number and the ‘001113’ is the invoice number.
Number of Copies and Invoice Labels
Then a screen displays that asks for the number of copies and a label for each copy. A label is not required for any of the copies. Make changes as needed. The program will recall the last settings for copies and labels.
The invoices are then printed.
If the starting invoice number has already been used in invoice history, the program looks for the next available invoice number and uses that. See the Starting invoice # field in Control Information .
Printing Confirmation
When the invoices have been printed, you are asked Are the invoices just printed OK ?.
When to answer No to Are the invoices just printed OK ?
Answer No if the invoices just printed are wrong due to:
| • | An incorrect billing date |
| • | Wrong selection of the series of orders to be billed |
| • | Inappropriate default comments |
| • | Wrong lines billed on invoices |
| • | Wrong printer group is selected |
| • | Wrong form is selected, or |
| • | Printer malfunction that has ruined the majority of the invoices. |
If you answer No, all invoices printed for this specific range of orders are considered to be not OK. Any previously printed ranges of orders are still considered to be OK if you answered Yes to Are the invoices just printed OK ? after printing those ranges.
If you answer No to Are the invoices just printed OK ?, you are asked a second question: Restart invoice printing ?.
Answer Yes to the Restart question if you wish to reprint all of the invoices that were bad at this time, without making any other changes to the orders concerned. If you answer Yes, the invoice printing screen reappears to enter another range of orders.
Answer No to the Restart question if you need to make changes to the orders prior to reprinting invoices. If you answer No, on the next screen you are asked to Please mount regular paper on printer and check box when ready.
Check the box when you have mounted the paper. Select OK to return to the menu.
When to answer Yes to Are the invoices just printed OK ?
Answer Yes to Are the invoices just printed OK ? if all of the invoices just printed are OK, or the majority are OK but a few have been damaged during printing. (The invoices being referred to here are the invoices for the range of orders just entered on the invoice printing screen.)
If you answer Yes to Are the invoices just printed OK ?, you are asked a second question: Reprint selected invoices ?.
If all of the invoices just printed are OK, answer No to this question and the invoice printing screen reappears to select another range of orders to print. Answer Yes to the Reprint question if the majority of the invoices are OK, but a few require reprinting due to being damaged during printing.
If you answer Yes to the Reprint question, a screen appears for you to enter the range to be reprinted. Enter the invoice numbers as printed on the invoice forms (rather than order numbers).
You are also asked for the starting invoice number for the reprint. This number defaults to the starting invoice number of the range specified so that you can reprint the invoices using the same numbers. (Be sure to destroy or otherwise void the first versions of these invoices.)
You may reprint as many different ranges of invoices as needed. You may reprint a specific range of invoices as many times as needed. However, you must always refer to an invoice by the number that appeared on the invoice the first time it was printed, and not the number that appeared on the invoice due to a reprint.
When reprinting invoices, you may also press <F1> for the starting invoice number to use the invoice number that is one greater than the last invoice printed. This is useful if you have preprinted invoice numbers on your forms and need to number invoices so that they correspond to the preprinted numbers on the forms.
When you have completed reprinting invoices, press <Esc> and the invoice printing screen reappears for you to select another range of orders to print.
You may elect to reprint invoices from invoice history.
Select
Reprint posted invoices from the Invoices menu.
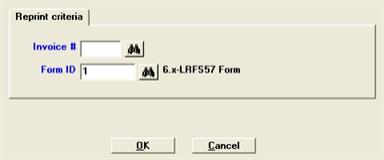
Graphical Mode
The screen to print invoices appears similar to this:
Character Mode
The screen to print invoices appears similar to this:

Enter the following information:
Enter the invoice number.
This number is from invoice history.
|
Format |
999999 |
Enter the ID of the form to be used for invoice printing.
Options
You may use one of the options:
|
<F1> |
To scan through the forms in the Form file |
|
<Enter> |
To use the default form ID specified in O/E Control information |
|
Format |
Five characters |
If the form ID does not have an Invoice, Order, or Credit memo type defined for it, a message displays to inform you that invoices will not be printed for the orders with missing form types. If none of the three types are defined for the form, no invoices can be printed.
Make any changes. Select OK to and select a printer to print the invoice or select Cancel to return to the menu.
You will be asked to mount the forms or when finished to mount the regular paper. Check the box and select OK to continue or Cancel to return to the menu.
PDF Reprint Invoice Generation
When you print the invoice with a Company information -PDF- printer, the program generates a PDF file on the system in the PDFFIL\OEINVOICES directory. You will find a definition of PDF in the Understanding Order Entry chapter. You may also print and generate PDF files using a -PDFP- printer. Because you are reprinting one invoice at a time, the file will display. Also you may view the generated PDF file from the CTL menu selection Email/view printed PDF's, located under the main menu selection PDF form file processing. Either Adobe Acrobat and Adobe Reader must be installed on your system. From that same menu selection you may also email PDF files. To understand these features see PDF Form File Processing chapter in the PBS System documentation.
To setup emailing in PBS see the appendix Email Configuration in the PBS Administration documentation.
If the PDF invoice you are generating has the same invoice number as a PDF that already exists the file will be overwritten. It will have the same amounts as the original and it should look the same as the original as long as you use the same invoice format.
|
Note |
You do not do a posting after reprinting an invoices from history. |
Print alignment ?
Select Yes to print an alignment or No to skip the alignment printing.
Alignments may be used if you are printing to one of the following:
| • | Company information laser printer |
| • | Company information -PDF- or -PDFP- printer |
| • | Windows printer |
Alignments to a Company information non-laser printer, like dot matrix, is done manually.
If you select a Company information PDF printer the program will display the alignment image as long as Adobe Acrobat or Adobe Reader is installed on your system and you are using the Windows version of PBS. You may also view the alignment again from the Ctl menu selection Email/view printed PDF's, located under the main menu selection PDF form file processing. Each time you run an alignment it will replace the previous PDF.
If you select Windows printer a Windows printer alignment screen displays. To change the alignment for Windows printer enter a number greater than the Default top margin or the Default left margin as the case may be.
(Printer selection window)
Select the printer that you want to print the invoice.
Windows printer is only available if you are using the Windows or Thin Client versions of PBS.
If you have UNIX/Linux and only one printer is entered in Company information it skips the printer selection screen.
After you have printed invoices and designated them as OK, you can post them to the I/C and A/R modules.
|
Note |
If you are using Purchase Order, any P/O receivings must be posted before posting invoices.) |
Select
Post from the Invoices menu.
In multi-user environments, when one user is posting invoices, other users may not use the Inventory selection in I/C or the Sales or Cash receipts selections in A/R. Conversely, while one user is using one of those three selections, invoice posting is not allowed.
If there are any unposted sales or cash receipts or inventory transactions, you are advised that they will be posted, as well as the invoices you have printed. Select Yes to proceed with posting; otherwise, select No.
There is a period of processing while sales and inventory transactions are created from the invoices. Then the orders that were partially billed are cleared of all fully shipped and billed items. Orders with unbilled items or back ordered items remain for future completion. An O type order is created for any I type order that contains back ordered items.
If there are any drop shipped or miscellaneous items on the invoices, the Miscellaneous/Drop Ship Item Register prints.
The Inventory Transaction Register then prints and the inventory transactions are posted (Refer to the Inventory Control user documentation).
After inventory transactions have posted in I/C, the Sales Journal is printed and the sales transactions are posted in A/R.
If a cash, check or credit card payment was received with an invoice or order type order, the Cash Receipts Journal then prints and the cash receipts are posted (see the Accounts Receivable User documentation). Cash is posted depending on your selection for Post cash receipts for in the O/E Control information and if you selected PBS Multi-payment in A/R Control information.
See a Miscellaneous Charges Journal sample in the Sample Reports appendix.
If you interrupt the printing of a register, you must use the corresponding module for that register (O/E, I/C, or A/R) and complete the posting steps for each module, in this sequence:
| 1. | I/C inventory |
| 2. | A/R sales |
| 3. | Misc. charges |
| 4. | A/R cash |
If you specified to retain invoice history in the O/E Control information, invoice history is updated when invoices are posted.
Invoice history is located in A/R. If you specified to retain A/R history in A/R Control information and you are using both A/R invoices and O/E orders, during posting the history from both modules are merged.
When posting invoices, you may see the message Duplicate sales or entry - see instructions. Press <Enter> to continue. If you see this message, check if there is a duplicate order or if invoices have already been printed for the orders currently being processed.
During invoice posting, a previously used invoice number might be assigned in one of two ways:
| • | The starting invoice number in the O/E Control information might have been reset to a lower number before printing invoices. |
| • | A sales transaction with a conflicting invoice number was entered through Sales in Accounts Receivable. |
If the software detects this condition, the order for which the invoice was printed remains, and the billing information is not posted to the A/R and I/C data. An invoice must be printed again for this order after the duplicate invoice number has been removed by changing the next invoice number to one that has not be used.
G/L distributions generated for line items are as follows:
Sales
| • | Debit item's expense account (Items) |
| • | Credit item's inventory account (Items) |
Credit memos
| • | Debit item's inventory account (Items) |
| • | Debit scrap account (entered when credit memo is entered) |
| • | Credit Item's credit memo account (Items) |
If you are using cost centers, the cost center for the expense and credit memo accounts is assigned as specified in O/E Control information. The cost center can be taken from either the order header, the line item, or the inventory item itself.
|
Note |
Negative quantity line items on type I and type O orders are handled the same as lines on credit memos. |
For drop shipped items, distributions are generated as follows:
Sales
| • | Debit item's expense account (Items) |
| • | Credit drop-ship clearing account (O/E Control information) |
Distributions for drop shipped and miscellaneous items are generated by Order entry. Distributions for other items are made by Inventory control when inventory transactions are posted. See an Inventory Transaction Register sample in the Sample Reports appendix.
This function exports valid E.D.I. unposted invoices, exports valid E.D.I. posted invoices from invoice history, creates an invoice export file, prints any required Error and Export reports, and updates the E.D.I. Audit status of the E.D.I. orders processed to EXPORTED. (You can see this on the E.D.I. Status Report.)
You should export E.D.I. invoiced orders before they are posted. Certain information such as order notes will not be exported from posted orders. Unposted invoices may be exported as often as required. To export an unposted invoice again, select the correct Exported order ? option.
Select
E.D.I. invoice export from the Invoices menu.
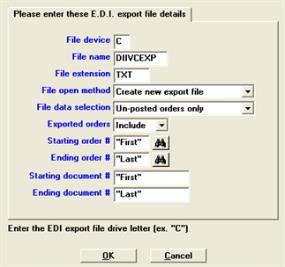
Graphical Mode
Character Mode
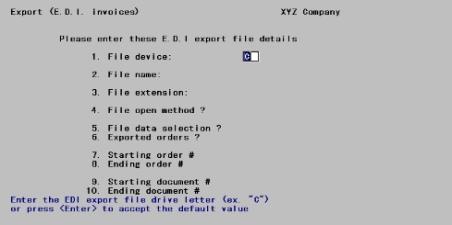
Enter the E.D.I. export file drive letter. The default is drive C.
Enter a file name, or press <Enter> to accept the default.
Enter the file extension for the export file, or press <Enter> to accept the default.
If you want to create a new export file, select Create new export file or C in character mode. If you want to append data to an existing export file, select Add to existing export file or enter A in character mode.
You may use the following options:
| Character | Graphical |
|
U |
Un-posted orders only |
|
P |
Posted orders only |
You may use the following options:
| Character | Graphical | Explanation |
|
I |
Include |
To include previously exported invoices. |
|
S |
Skip |
To skip previously exported invoices. |
|
O |
Only |
To export only previously exported invoices. |
Enter the starting order #, or press <F2> to use the "first" E.D.I. Order number of an unposted E.D.I. invoice.
Enter the last order number, or press <F2> to use the "last" E.D.I. Order number of an unposted E.D.I. invoice.
Enter the starting E.D.I. document number of an unposted invoice, or press <F2> to use the first E.D.I. order number of an unposted E.D.I. invoice. When exporting Posted invoices, this field will be Invoice #.
Enter the ending E.D.I. document number, or press <F2> to use the last E.D.I. document number of an unposted E.D.I. invoice. When exporting Posted invoices, this field will be Invoice #.
Select OK to export the data or Cancel to return to the menu.
If there were not errors found, when the export is finished a message displays indicating:
EDI export has finished, verify the EXP Report.
An E.D.I. Invoice Export Report is printed to disk. To view or print the report Print a report un the CTL menu selection of Print reports from disk.
An E.D.I. Invoice Export Report is similar to an E.D.I. Order Export Report. See an E.D.I. Order Export Report sample in the Sample Reports appendix.
If there is nothing to export then the message indicates:
No E.D.I. export data in range selected.
There is no report printed in this case.
E.D.I. orders and their current and previous status can be reviewed by using the E.D.I. status report.
Reporting can be done at any time in the processing cycle.
Select
E.D.I. Status report from the Invoices menu.
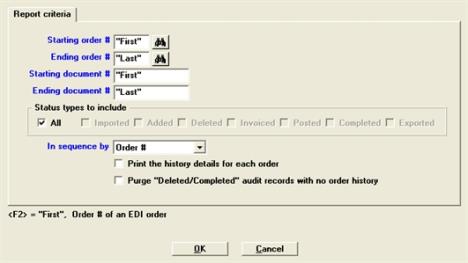
Graphical Mode
Character Mode
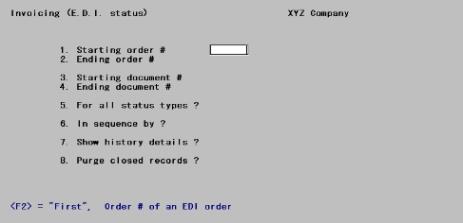
Enter the order or press <F2> to use the first order # of an E.D.I. order.
Enter the order or press <F2> to use the last order of an E.D.I. order.
Enter the E.D.I. Document number or press <F2> to use the first E.D.I. document #.
Enter the E.D.I. Document number or press <F2> to use the last E.D.I. document # of a E.D.I.order.
In graphical mode check the boxes of the status types you want to include.
Check the "All" box to include all status types. Uncheck it to select specific status types. Specific status types include the following date types:
| • | Imported |
| • | Added |
| • | Deleted |
| • | Invoiced |
| • | Posted |
| • | Completed |
| • | Exported |
In character mode enter Y to include all status types.
Enter N to display the following window:
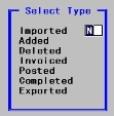
Enter Y or N to exclude the types of status to output on the report.
Enter the sequence type, select either:
| Character | Graphical |
|
O |
Order # |
|
D |
E.D.I. document |
Print the history details for each order
Check this box to print the history details for each order. Leave it unchecked to suppress the history details.
Purge "Deleted/Completed" audit records with no order history
Check this box to purge Deleted/Completed audit records. Leave it unchecked to suppress this action.
Select OK to print the report and purge records if the last field is checked. Select Cancel to return to the menu.
You then have the option to output the report to a printer, disk file, or the screen.
See an E.D.I. Status Report sample in the Sample Reports appendix